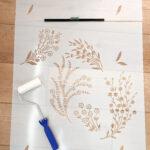
Today I am so excited to share a project that I have been focusing on for the past few weeks- our baby girl's nursery accent wall! I spent so much time researching what I wanted her room to look like, and this floral wall stencil from Cutting Edge Stencils fits my wildflower theme perfectly.
Stenciling is such a budget friendly option to choose when creating an accent wall and I am thrilled with the results. My parents are total rockstars and I could not have done this without them! I recommend grabbing a willing helper for this project- pregnant or not! Plus it is just more fun having a buddy to do it with. Read on for the full details below.
Looking for more home inspiration?
- Create a Subtle Jungle Themed Nursery
- My Modern Boho Bathroom Decor Finds
- Easy Collage Wall: Tips for Hanging Picture Frames

If you love stenciling projects, check out our Herringbone Stencil Accent Wall too!
Supplies for the Nursery Accent Wall
- Wild Meadows Wall Stencil
- Stencil Essentials kit
- Paint- I used Benjamin Moore in "Southern Charm" for the wall and "Soft Cranberry" for the stencil color
- Painters Tape
- Drop cloth
Cutting Edge Stencils recommends using a flat or an acrylic paint, so I went to our local Benjamin Moore Paint store for regular wall paint in a flat sheen. I chose a few paint samples to begin with and painted them on the wall to narrow down the colors. Once I had my colors, I went back to the store and got quart sizes. The colors I chose were "Southern Charm" for the nursery accent wall and "Soft Cranberry" for the floral wall stencil color. Here's what the room looked like before I started:

I would highly recommend purchasing the Stencil Essentials Kit from Cutting Edge Stencils also-the clip on leveler makes it so much easier to line up the stencil each time! The photo below shows the two stencil pieces- a top edge and the main stencil piece, and then the accessories kit with the leveling tool, the foam roller (and not pictured- a stippling brush). This stencil is also available as a 5 piece, with the individual flowers as their own pieces.

Step One: Prepping the wall
This step is quick and easy! We wiped the wall down with a microfiber towel, just to make sure that it was clean and free of dust. There were also a few holes that needed filling in from wall art that was hanging on the wall previously. For reference, this accent wall is 10 feet wide by 8 feet tall.
Step Two: Painting the Wall
My dad helped paint the wall this adorable shade of pink. I love that it is not necessarily a "baby pink" and will still look cute as our baby grows from infant to little girl. This is shade "Southern Charm" from Benjamin Moore in Flat. We taped off the edges of the wall using painter's tape, and then used a roller to paint the entire wall.
Tip: The drop cloth is very helpful for this step. It will keep the floors clean and inevitably there will be some paint drips at some point. This nursery accent wall took three coats of paint and two days to finish- the painting time was relatively quick, but we let each layer fully dry in between coats.

The great thing about flat paint is that it dries fairly quickly! I also allowed the wall to dry completely before starting the stencil- it ended up being a full week in between starting the stencil and finishing the overall accent wall color for me, but I would suggest waiting at least 24 hours before starting the stencil.
Step Three: Prepping for Stenciling!
The stencil I chose had a top edge piece for the upper edge of the wall, near the ceiling. We started at the top left corner of the wall and worked our way down, forming one row, and then back to the top again, repeating like this until finished. We found out very quickly that the wall itself was not even. The clip on leveler was so helpful for keeping our lines and stencil straight/level. Make sure that the leveler is fully attached and flush to the bottom of the stencil (and level) before painting. As you can see from the photo below, the top edge of the wall looks very uneven- but the stencil is completely level. We always went off the level and guides from the floral wall stencil- not based off of the wall corners and edges.

Tip: Read the directions that the stencil comes with! The directions are so clear and full of very useful tips and tricks. My biggest takeaway from doing this stencil is that the ratio of paint on the roller and then roller pressure on the stencil is KEY. Less paint is definitely more when it comes to this- it will decrease bleeding under the stencil. I preferred to use less paint and apply medium pressure on the stencil with my roller, even if that meant going over the stencil a few times to get it fully covered. Once we added paint to the roller, we rolled it onto brown paper a few times before using it on the wall- this helped us be able to tell if the paint was distributed evenly on the roller and if it was the right amount of paint.

Step Four: Stenciling!
This floral wall stencil is very detailed and I love it for that reason! But it also required patience. It was not hard, but it took time- so don't be discouraged if it takes longer than expected. The outcome is so so worth it! This nursery accent wall took my mom and I about three days to finish. It could be done in less time than this, but we are newbies at stenciling and I am also 8 months pregnant. haha. Always remember to thoroughly clean the brushes and foam rollers after each use and make sure the paint lid is on so it doesn't dry out between uses.

Like mentioned earlier, we started from the top left corner of the wall and worked our way down and over. The photo above shows the first top edge and first full stencil completed. The guides for the next stencil are the bottom two leaves on either side.
Isn't it wild how different the paint looks depending on the time of day?! Still so beautiful all the time, but the afternoon sun (photo below) makes it all warm and cozy in this room and I LOVE IT!

We followed the same general pattern each time we placed the stencil:
- use the self leveling tool to make sure the stencil is level on the wall
- once level, tape the stencil to the wall with painters tape
- one person painted over the stencil while the other helped hold it in place (this isn't necessary, but it definitely helped having two people!)
- using the stippling brush if we were in a hard to reach area (like the very top edge by the ceiling or near the base boards)
- pulling the stencil off the wall carefully
- dabbing any excess paint off the back of the stencil
- repeat process

The stencil has built in guides to help line up the pattern, which is great because it made lining up the stencil and leveling it so much easier as we worked down the wall.

Step Five: Edges
We saved the edges and bottom of the wall for last. The reason for this is that I wasn't quite sure what to do with it at first, and we realized very quickly that we would need to fill in around the edges in some ways that was going to be difficult with the full stencil.
The photo below shows the starting edge on the far left side of the wall. We felt that the stencil looked incomplete with some gaps in the pattern- This might not bother everyone, and that's cool too!) We ended up cutting out one of the smaller flowers in the stencil, and then using just that one to fill in the gaps all the way down the wall on the far left side. I would NOT recommend doing this until you are 1000% sure that you will not need the full stencil again. It definitely made that edge feel more complete once we finished.

When it came to finishing the bottom of the wall, we cut the stencil in half because it was easier to manage painting it and we were at the very end of the project. This was my preference, BUT it is definitely possible to bend the stencil and paint, keeping the stencil intact for any future projects. So I would only recommend cutting it if you are sure that this will be a one time use and ONLY at the very end of the project.
Finished Nursery Accent Wall
I am so so happy with how this wall turned out! It is perfect for my little girl and I cannot wait for her to see this room. It adds the perfect pop of cheeriness and color that we did not have in here before.

FAQs
I would say that this is not "hard"- meaning not complicated. But it is time consuming and requires patience!
YES. We definitely made mistakes. Especially as we were trying to figure out how much paint to put on the roller and then how much pressure to roll on to the stencil with. I noticed ALL of our mistakes as we were going along- but now that the stencil is completely finished, I can't see them. Don't worry if some seem heavier or some seem lighter, it gives the wall character and no one will see those flaws when the whole project is finished.
This took us a total of 5 days. Two days to paint the accent wall color, and then 3 days to finish the stencil. We did not work completely full days, but I would say we averaged about 5 hours per day when working on the stencil. Taking breaks helped us a lot!
It does. After the second day of using the stencil, I soaked it overnight and gently scrubbed the paint off of the stencil. This helped us quite a bit, so I would suggest doing this when needed for a larger project. Just be careful because the stencil cutouts are intricate so it is very delicate!
I used an outside hose (or this can be done in the sink) and rinsed them thoroughly until the water ran clear. You can use your hands to help wring the paint out while rinsing. Once they were clean, I put them in safe place where they could fully dry out before the next use.

Final Thoughts
I hope you enjoyed reading about my nursery accent wall using a floral stencil! I am so excited to share the final nursery tour SOON and show some other DIY projects- like the DIY baby mobile I am making for this room. Stay tuned!
If you're interested in other DIY Projects that we have done, check these out:
xoxo,
Melanie
How to Create a Nursery Accent Wall using a Floral Wall Stencil!
Equipment
- Wild Meadows Wall Stencil
- painters tape
- paint roller
- stipple brush
- leveling tool
- dropcloth
Materials
- 1 quart paint of choice for accent wall I used "Southern Comfort" by Benjamin Moore in Flat Sheen
- 1 quart paint for choice for stencil I used "Soft Cranberry" by Benjamin Moore in Flat Sheen
Instructions
- use the self leveling tool to make sure the stencil is level on the wall and lined up with stencil guides
- once level, tape the stencil to the wall with painters tape
- one person paints over the stencil while the other helps hold it in place (this isn't necessary, but it definitely helped having two people!)
- use the stippling brush if in a hard to reach area (like the very top edge by the ceiling or near the base boards)
- carefully pull the stencil off the wall
- dab any excess paint off the back of the stencil
- repeat process until fully complete


Leave a Reply