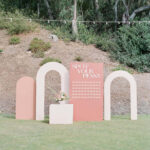
I got married in July of 2021, and I know everyone says this, but it really was the Best. Day. Ever. Wedding planning was such a fun season for me. I loved adding custom details to my wedding like this wedding arch backdrop and my avocado dyed bridesmaid dresses.
I had a very specific vision for our day, which meant that I had to make quite a few decisions on whether to tackle projects myself or pay vendors to do them for me. As any bride comes to find out, weddings are EXPENSIVE! So, as you can imagine, I added quite a few projects to my to-do list to try to cut down costs. One of the first projects I decided to DIY was creating an arch backdrop that included panels and our seating chart. It was a HUGE money saver! As long as you have close friends or family members who are handy and ready to help, this is such a fun project to do!

Photo Credit: Danielle Bacon Photography
I searched all over instagram, pinterest, google, and wedding websites to find wedding seating chart wall inspo. After pulling from a few different ones, I narrowed down on what I wanted, including arch panels. My goal was to make something unique, fun, and incorporate our precious pomeranian, Penelope, into our wedding day. I reached out to a local vendor to get a quote for my vision, and I was quoted well over $1000!! I mean.. that was out of the budget, to say the least!! With a little bit of planning, I made these arch backdrop panels and seating chart for under $250 (shoutout to my amazing brother and friends who helped!).

Materials:
- 3 Pieces of Plywood ( 4x8 ft, ⅜ in thick)
- 3 Different Colors of Paint
- Electric Saw
- 100 grit Sandpaper or Electric Sander
- Tape Measure
- Pencil or Marker
- String
I picked up 3 pieces of the least expensive plywood that I could find at Home Depot, but in hindsight, I think I would have upgraded to a slightly thicker option (to at least ½ in). This worked perfectly fine for me though, and it did save some precious dollars! I also picked out 3 different colors of paint. Tip: ask for samples of the paint! Sample sizes come in pints, and you don’t need very much for this project.

Boho seating chart arches
This definitely took up quite a bit of time! It was more challenging than I originally expected, and honestly, my brother saved the day on this, so I would recommend having a project helper. The first step is to map out and draw the semi-circles for your cuts. I know there are tools that you can use to make a semicircle, but we did it the simple way and used a pencil and string.

Tips
- Start with your largest arch, ours was created at 7ft. Find the center of the board and draw a semi-circle.
- Draw another semi-circle 1ft lower (or whatever you decided your width is) before cutting.
- Keep in mind that you will need to shorten the length of the string, and you need to form a new center mark lower than your first!
- To double check our arch, we took the tape measure and measured at random points along both the upper and lower semi circles of the arch, making sure each point was exactly the same distance from the initial center marks.

- Follow the same steps for your other arches, just adjust the sizing as needed. We made the second arch 6ft tall and 8.25 inches wide instead of the original 1 ft. We used the same method for the second arch, except we made its highest point 6 ft tall, and we made the arch 8.25 inches wide, instead of 1 ft wide for added dimension.

- For the third, solid arch, we used the inside of the second arch- as long as you don’t mess up the inner piece, this arch is basically made at the same time as the second one! So easy!
Once all of the pieces were cut, we used sandpaper to smooth out all of the edges on the wedding seating chart. Once each piece was smooth and ready to go, I painted them in alternating colors. Tip: Don’t forget to paint the side and top edges! I only needed one coat of each paint color.
Planning the DIY Wedding Seating Chart
Along with the arches, I made our seating chart for our wedding. This really tied together the whole look with the arch backdrop! Getting the dimensions right for the wedding seating chart wall took a little bit of trial and error, but ultimately we decided on keeping the main wall with the escort cards 7 ft tall, the tallest arch 7 ft tall, and then the second arch 6 ft tall, and the third 5.3 ft tall.

Seating chart wall
This was the easiest one to cut! We measured 7 ft from the base (or 1 ft from the top) and marked off a straight line across the top. Using the Electric Saw, we cut across that straight line.
Creating DIY Escort Cards
Once your wall and arches are dried- the rest is up to you and your vision!!! I found these amazing pomeranian wooden cut outs on Etsy. I painted those, and then used them as our escort cards on our boho seating chart. The “Spot your Penny” phrase I also ordered from this Etsy shop. They were vinyl block letters that came ready with commercial grade sticky tape on the back!

Thanks for letting me share! If you're looking for inspiration for a smaller get together, check out my easy beach picnic party set up!
DIY Wedding Arch Backdrop Panels
Equipment
- Dewalt 15 Amp 7-¼ in. Lightweight Circular Saw
Materials
- 3 sheets plywood 4x8 ft ⅜ thick
- 1 pencil
- String
- Tape Measure
- 100 grit sandpaper
Instructions
- For the Larger Arch: Cut the top of the arch to 7 ft tall. Next create a semicircle with the string and pencil. To do this, Find the center of the board 2 feet down from the top of the board, and draw a semi circle. The string should be long enough to reach the outer edges of the plywood, just before reaching that true half-circle mark. The width of the board is 4 ft, so the string should be about 2 ft!
- Next, draw another semicircle 1 ft lower. To do this, shorten the string to 1 ft in length and find the center 1ft below the original center mark. After creating this second semicircle with the pencil and string, the width between the two should be 1 ft.To double check our arch, we took the tape measure and measured at random points along both the upper and lower semicircles of the arch, making sure each point was exactly the same distance from the initial center marks.
- Next, draw a straight line across from where the curve of the outer semicircle meets the outer edge of the plywood to the inner semicircle of the arch.
- Trace a straight line down to the bottom of the arch from that inner point- This will form the inner leg of the arch. Repeat on the other side.
- Use the same method above for the second arch. For this one, we made its highest point 6 ft tall, and we made the arch 8.25 inches wide, instead of 1 ft wide. We followed the same steps to test that the arch was symmetrical and to measure and map out the legs.
- For the third, solid arch, we used the inside of the second arch- as long as you don’t mess up the inner piece, this arch is basically made at the same time as the second one with no extra steps.
- Using the pencil markings as a guide, cut out the arches with the electric saw. Like stated earlier, the solid arch will be made at the same time as the second, smaller arch, so don't throw this piece away!
- For the main wall where the lettering and the escort cards go, simply cut 1 ft off the top of the plywood. SO Easy!
- Once all of the pieces are cut, use sandpaper to smooth out all of the edges on the DIY Wedding Arch Backdrop panels.
- Once each piece is smooth and ready to go, paint them in alternating colors.
Notes
xoxo, Melanie


Miranda says
These are so pretty!!! Thank you for sharing your process on how to make them! One question I have is how they stood up? I don’t see any feet on them.
Melanie Jameson says
Hi Miranda! I'm so glad you love them! For the seating chart wall- I attached 2x4 beams to the back with liquid nails, and then braced the bottom with a bracket and two more 2x4 pieces- at 45 degrees and 90 degrees (so it formed a triangle) and then weighted those. I used pieces of rebar for the arches and attached those to the backs with Flex Paste. I left about 9 inches to a 1 foot at the bottom and pushed the rebar into the grass to hold the arches. I hope that helps!
Emily says
I’m obsessssed with the dog cut outs and this whole project! What size cut outs did you use? Did you hand paint the names on each of them? And you did couples on the same dog instead of each person getting their own dog? I’m trying to figure out how to make this part of the project! Thanks for sharing!
Melanie Jameson says
Hi Emily! So glad you love it! It was a special tribute to our little girl 🙂 I purchased these on Etsy, but the company I bought them from are no longer taking orders. I painted each piece and then we used a white craft pen to write the names! I did group families onto 1 piece if they were seated at the same table (ex: The Jameson Family or Mr & Mrs Benjamin Jameson). I hope this helps!
wendy says
Beautiful! How did you get them to stand up straight?