
This book accent wall was build for my baby shower, however I feel like it would be a great art display on it's own!
When planning out your book wall, you'll need to decide your commitment level/how long you want to keep it on your wall. That will determine the supplies and investment needed. Since this was a feature wall for my baby shower we used velcro command strips. If you're ok with holes in the wall/it will be there a while you could definitely use a hammer and nails to create this book accent wall.

Tips
- Tear out a lot of pages from the books to make them lighter
- Use painters tape to map out your design
- Use a mix of hardcover and paperback books. Scope out a friends of the library sale, garage sales or thrift stores for your books. Our hardcovers were $0.50 each and the paperbacks $0.10. Plus, books that have been discontinued you don't feel quite as bad about ripping apart.

Supplies
- Books- we used 12 hardcover and 3 paperback
- Painters tape
- Velcro command strips-I purchased a variety of sizes, but we did use a lot of these. We used 2 for the smaller books and 3 for the larger. So 45ish. I bought a variety of sizes and my mom picked up a mega pack. If you don't mind holes in the wall or it will be a permanent feature you could definitely use a hammer and nails.
- Hot glue gun and hot glue, glue or tape. You'll use this to stick the pages together so they stick out when they're on the wall.
Steps
- I drew out what I was thinking as the first step. I knew we'd use a mix of actual books and pages. Using painters tape make an outline of your design. It doesn't have to be perfect and you're allowed to changed your mind!


- Cut off any dust jackets from your book covers and if possible break the spines.
- Tear out a bulk of the pages, this will make the books lighter when you're attaching them to the wall. It will also give you a good amount of pages to use a filler around the books.

- Put the velco strips on the back of the book covers and place on the wall. Push into the wall and secure.
- Using hot glue or tape flip open some pages and tape together to get the desired look. Avoid any pages with pictures or header text.
- Once you have the outline complete, add your filler pages with painters tape to make your design or just to make the arch fuller.

FAQ
What kind of books should you use?
Use books you know you'll never read again, or pick some up at a library sale.
What adheres to the wall without damaging it?
We used velcro command strips that can be used to hang photos and didn't have any damage!
How long does this project take?
This took us about 2 hours total.
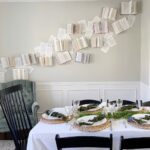
How to Make an Open Book Accent Wall
This open book accent wall was a great feature at my baby shower! It was the perfect backdrop for photos and would be a cute art feature as well.
Yield: 1 accent wall
Cost: $30
Equipment
- 1 hot glue gun or glue dots, glue sticks, tape.
Materials
- 45-50 velcro command strips
- 15 books mix of hardback and paperback
- 1 roll scotch tape
- 1 roll painters tape optional
Instructions
- I drew out what I was thinking as the first step. I knew we'd use a mix of actual books and pages. Using painters tape make an outline of your design. It doesn't have to be perfect and you're allowed to changed your mind!
- Cut off any dust jackets from your book covers and if possible break the spines.
- Tear out a bulk of the pages, this will make the books lighter when you're attaching them to the wall. It will also give you a good amount of pages to use a filler around the books.
- Put the velco strips on the back of the book covers and place on the wall. Push into the wall and secure.
- Using hot glue or tape flip open some pages and tape together to get the desired look. Avoid any pages with pictures or header text.
- Once you have all the books attached, add your filler pages with painters tape to make your design or just to make the arch fuller.


Melanie says
Love this!!! Its so beautiful!