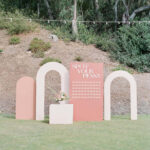
DIY Wedding Arch Backdrop Panels
Yield: 3 arches
Equipment
- Dewalt 15 Amp 7-¼ in. Lightweight Circular Saw
Materials
- 3 sheets plywood 4x8 ft ⅜ thick
- 1 pencil
- String
- Tape Measure
- 100 grit sandpaper
Instructions
- For the Larger Arch: Cut the top of the arch to 7 ft tall. Next create a semicircle with the string and pencil. To do this, Find the center of the board 2 feet down from the top of the board, and draw a semi circle. The string should be long enough to reach the outer edges of the plywood, just before reaching that true half-circle mark. The width of the board is 4 ft, so the string should be about 2 ft!
- Next, draw another semicircle 1 ft lower. To do this, shorten the string to 1 ft in length and find the center 1ft below the original center mark. After creating this second semicircle with the pencil and string, the width between the two should be 1 ft.To double check our arch, we took the tape measure and measured at random points along both the upper and lower semicircles of the arch, making sure each point was exactly the same distance from the initial center marks.
- Next, draw a straight line across from where the curve of the outer semicircle meets the outer edge of the plywood to the inner semicircle of the arch.
- Trace a straight line down to the bottom of the arch from that inner point- This will form the inner leg of the arch. Repeat on the other side.
- Use the same method above for the second arch. For this one, we made its highest point 6 ft tall, and we made the arch 8.25 inches wide, instead of 1 ft wide. We followed the same steps to test that the arch was symmetrical and to measure and map out the legs.
- For the third, solid arch, we used the inside of the second arch- as long as you don’t mess up the inner piece, this arch is basically made at the same time as the second one with no extra steps.
- Using the pencil markings as a guide, cut out the arches with the electric saw. Like stated earlier, the solid arch will be made at the same time as the second, smaller arch, so don't throw this piece away!
- For the main wall where the lettering and the escort cards go, simply cut 1 ft off the top of the plywood. SO Easy!
- Once all of the pieces are cut, use sandpaper to smooth out all of the edges on the DIY Wedding Arch Backdrop panels.
- Once each piece is smooth and ready to go, paint them in alternating colors.
Notes
Tip: Don’t forget to paint the side and top edges! I only needed one coat of each paint color. Ask to buy samples of the paint and you should have enough for this project.
